I’m a bit of a home networking nerd. After many iterations, I’ve settled on a custom built Linux home router. My goals are:
- Secure as possible.
- Supports fq_codel and the ability to disable kernel offloads to favor latency and eliminate bufferbloat.
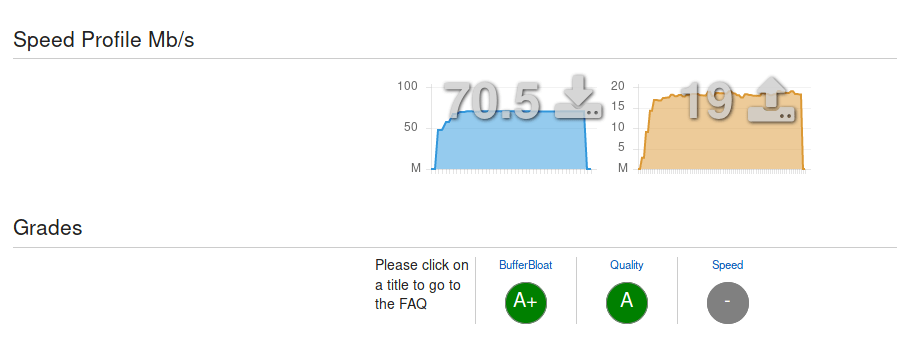
You can do a basic test of your router setup using http://www.dslreports.com/speedtest. The important thing is the bufferbloat rating. You want this as good as possible (A+ ideally) to avoid lag during normal or heavy usage. Here’s my result on UK Fibre-To-The-Cabinet (FTTC):
You can find the ansible for my automated setup here: https://github.com/jsravn/hamster.
Hardware
First you need to choose your hardware. There are many options here. I wanted something compact and fanless, similar to a consumer embedded router but with an x86 processor. I chose a Netgate RCC-VE 2440 which cost $349. It’s a bit on the pricey side, but suits me perfectly. It’s discontinued now, but there is the similar, cheaper Netgate MBT-2220 for $250 which also looks very good.
I have a separate Ubiquiti AC Lite for my wifi needs, which sits on the LAN.
Setup
You need to install a Linux OS. I chose Debian stretch since it’s relatively stable and I like Debian based OSs. It also supports fq_codel out of the box.
I won’t cover installing or using Linux here, there are plenty of guides for that. Instead, I’ll give a summary of the software I installed on the router and configuration settings I used for each.
The basics are:
/etc/network/interfaces– The main configuration for Debian’s networking.- shorewall – Firewall/iptables management. Can setup almost anything you need a router to do (port forwarding, masquerading, etc.).
- isc-dhcp-server – DHCP server for managing IP addresses on the LAN.
- unbound – DNS server for resolving and caching DNS queries. Also handles blocklists for blocking ads and anything else.
You also probably want to manage all this in an automated fashion. I use ansible checked into a git repo. It’s up to you what to use – you could also do everything manually if you want, but it will be painful to maintain it.
/etc/network/interfaces
This is the main configuration for the network interfaces on your router. Since my router has 4 routeable ports, I software bridge them all to give me some additional ports. You could also create separate networks if you’d like. This is also where you configure PPPoE if needed. Here’s a sample configuration based on my own setup:
This file contains hidden or bidirectional Unicode text that may be interpreted or compiled differently than what appears below. To review, open the file in an editor that reveals hidden Unicode characters.
Learn more about bidirectional Unicode characters
| # The loopback network interface | |
| auto lo | |
| iface lo inet loopback | |
| # vdsl modem / wan port | |
| auto eth0 | |
| iface eth0 inet static | |
| address 192.168.10.2 | |
| netmask 255.255.255.0 | |
| # to support jumbo frames on ppp (1500 mtu + 8 byte PPPoE overhead) | |
| mtu 1508 | |
| post-up /sbin/ethtool -K eth0 gro off gso off tso off | |
| # PPPoE connection | |
| auto provider | |
| iface provider inet ppp | |
| provider provider | |
| # Bridged interfaces | |
| iface eth1 inet manual | |
| iface eth2 inet manual | |
| iface eth3 inet manual | |
| # LAN Bridge | |
| auto br0 | |
| iface br0 inet static | |
| bridge_ports eth1 eth2 eth3 | |
| address 192.168.1.1 | |
| netmask 255.255.255.0 | |
| # Disable any sort of offloading to avoid buffers/latency | |
| post-up /sbin/ethtool -K br0 gro off gso off tso off | |
| post-up /sbin/ethtool -K eth1 gro off gso off tso off | |
| post-up /sbin/ethtool -K eth2 gro off gso off tso off | |
| post-up /sbin/ethtool -K eth3 gro off gso off tso off |
I’ve disabled GRO/GSO/TSO to prevent the kernel from messing around with packets by coalescing them. This may increase CPU usage and reduce throughput (theoretically), but the benefits are improved latencies (also somewhat theoretical).
The ppp configuration is placed in /etc/ppp/peers/provider. There should already be a sample file there. The only changes I made were to the user,mtu and mru values (setting each of those to 1500, as ppp will default to 1492 otherwise).
To disable the offloads for ppp, you need to create a file /etc/ppp/ip-up.d/ethtool:
This file contains hidden or bidirectional Unicode text that may be interpreted or compiled differently than what appears below. To review, open the file in an editor that reveals hidden Unicode characters.
Learn more about bidirectional Unicode characters
| #!/bin/sh | |
| /sbin/ethtool -K ppp0 gro off gso off |
This will get run every time the ppp interface comes up.
Not much else to add here, that’s about it. See the manpages for more details.
Shorewall
Shorewall handles the firewall, masquerade, and fq_codel configuration. It can also do port forwarding for you. Shorewall is managed by creating a bunch of small files in the /etc/shorewall directory. Each file has its own manpage with details, e.g. man shorewall-interfaces. I suggest following the excellent manpages for the most part.
Here is my sample configuration for fq_codel, which is easy to setup in shorewall.
This file contains hidden or bidirectional Unicode text that may be interpreted or compiled differently than what appears below. To review, open the file in an editor that reveals hidden Unicode characters.
Learn more about bidirectional Unicode characters
| ppp0 1 full full 1 default,fq_codel | |
| ifb0:2 1 full full 1 default,fq_codel |
This file contains hidden or bidirectional Unicode text that may be interpreted or compiled differently than what appears below. To review, open the file in an editor that reveals hidden Unicode characters.
Learn more about bidirectional Unicode characters
| # This should be set to slightly less than your raw upload speed. | |
| ppp0 0 19mbit | |
| # This should be set to slightly less than your raw download speed. | |
| ifb0 0 72mbit classify ppp0 |
This file contains hidden or bidirectional Unicode text that may be interpreted or compiled differently than what appears below. To review, open the file in an editor that reveals hidden Unicode characters.
Learn more about bidirectional Unicode characters
| # Setup ifb to ratelimit upload for fq_codel. | |
| modprobe ifb numifbs=1 | |
| ip link set ifb0 up |
Those three files are all that’s needed to get fq_codel working. Afterwards you should see a significant improvement in your bufferbloat scores, assuming you set upload and download speeds correctly.
Finally, here is the rest of the config:
This file contains hidden or bidirectional Unicode text that may be interpreted or compiled differently than what appears below. To review, open the file in an editor that reveals hidden Unicode characters.
Learn more about bidirectional Unicode characters
| # wan is setup with some basic filtering settings. | |
| wan ppp0 detect routefilter,tcpflags | |
| # lan is bridged and uses dhcp. | |
| lan br0 detect dhcp,bridge | |
| # modem is a separate interface for direct access to the vDSL UI. | |
| modem eth0 |
This file contains hidden or bidirectional Unicode text that may be interpreted or compiled differently than what appears below. To review, open the file in an editor that reveals hidden Unicode characters.
Learn more about bidirectional Unicode characters
| #ZONE TYPE OPTIONS IN_OPTIONS OUT_OPTIONS | |
| fw firewall | |
| wan ipv4 | |
| lan ipv4 | |
| modem ipv4 |
This file contains hidden or bidirectional Unicode text that may be interpreted or compiled differently than what appears below. To review, open the file in an editor that reveals hidden Unicode characters.
Learn more about bidirectional Unicode characters
| ppp0 192.168.0.0/16,10.10.3.0/24 | |
| eth0 |
This file contains hidden or bidirectional Unicode text that may be interpreted or compiled differently than what appears below. To review, open the file in an editor that reveals hidden Unicode characters.
Learn more about bidirectional Unicode characters
| #SOURCE DESTINATION POLICY LOGLEVEL BURST | |
| wan all DROP | |
| fw all ACCEPT | |
| lan all ACCEPT | |
| all all REJECT |
This file contains hidden or bidirectional Unicode text that may be interpreted or compiled differently than what appears below. To review, open the file in an editor that reveals hidden Unicode characters.
Learn more about bidirectional Unicode characters
| #ACTION SOURCE DEST PROTO DPORT SPORT ORIGDEST | |
| # allow certain ICMP to not break TCP and pings | |
| ACCEPT wan fw icmp 0,3,4,8,11 | |
| # example port forwarding | |
| DNAT wan lan:192.168.1.10 tcp 2628 | |
| DNAT wan lan:192.168.1.10 udp 2628 |
If using ppp, make sure you add “wait_interface=ppp0” to /etc/default/shorewall.
isc-dhcp-server
This is the open source dhcp server the router will use to assign IPs on your LAN. It supports static IPs and all sorts of dhcp options. It also has a built in cli for viewing leases. If you copy oui.txt (you can google and find this file easily) to /usr/local/etc/oui.txt, the cli will show you the maker of the device as well – e.g. Apple, Nintendo, and so on.
Here is a sample configuration assigning a subnet to the LAN bridge as well as some static IPs. I’ve also set it to provide the router’s IP as the preferred DNS server.
This file contains hidden or bidirectional Unicode text that may be interpreted or compiled differently than what appears below. To review, open the file in an editor that reveals hidden Unicode characters.
Learn more about bidirectional Unicode characters
| # The ddns-updates-style parameter controls whether or not the server will | |
| # attempt to do a DNS update when a lease is confirmed. We default to the | |
| # behavior of the version 2 packages ('none', since DHCP v2 didn't | |
| # have support for DDNS.) | |
| ddns-update-style none; | |
| # option definitions common to all supported networks… | |
| option domain-name "home"; | |
| option domain-search "home"; | |
| # 8 day leases – we don't need short leases | |
| default-lease-time 691200; | |
| max-lease-time 691200; | |
| # If this DHCP server is the official DHCP server for the local | |
| # network, the authoritative directive should be uncommented. | |
| authoritative; | |
| # Use this to send dhcp log messages to a different log file (you also | |
| # have to hack syslog.conf to complete the redirection). | |
| log-facility local7; | |
| # LAN | |
| subnet 192.168.1.0 netmask 255.255.255.0 { | |
| range 192.168.1.100 192.168.1.254; | |
| option routers 192.168.1.1; | |
| option domain-name-servers 192.168.1.1; | |
| } | |
| # Static IPs | |
| host mypc { | |
| hardware ethernet 00:11:22:33:44:55; | |
| fixed-address 192.168.1.3; | |
| } |
Also update /etc/default/isc-dhcp-server with the listening interfaces. Mine is INTERFACES="br0".
Unbound
I use unbound as the DNS server after using it a lot in pfSense. I prefer unbound because the DNS requests are resolved directly with the root servers and authoritative servers for the relevant domains. By enabling preemptive lookups and caching, we can also avoid some of the performance impact of doing so.
Using unbound isn’t strictly necessary – dnsmasq is also a nice alternative that will be faster generally (but you’ll need to use an external DNS resolver).
Fortunately the debian package makes it quite easy to use unbound – it handles auto updates of the root key and so on. This is setup in /etc/default/unbound.
This file contains hidden or bidirectional Unicode text that may be interpreted or compiled differently than what appears below. To review, open the file in an editor that reveals hidden Unicode characters.
Learn more about bidirectional Unicode characters
| # If set, the unbound daemon will be started and stopped by the init script. | |
| UNBOUND_ENABLE=true | |
| # Whether to automatically update the root trust anchor file. | |
| ROOT_TRUST_ANCHOR_UPDATE=true | |
| # File in which to store the root trust anchor. | |
| ROOT_TRUST_ANCHOR_FILE=/var/lib/unbound/root.key | |
| # If set, the unbound init script will provide unbound's listening | |
| # IP addresses as nameservers to resolvconf. | |
| RESOLVCONF=true | |
| # If set, resolvconf nameservers will be configured as forwarders | |
| # to be used by unbound. | |
| RESOLVCONF_FORWARDERS=false | |
| #DAEMON_OPTS="-c /etc/unbound/unbound.conf" |
I have a file at /etc/unbound/unbound.conf.d/home.conf with the main configuration.
This file contains hidden or bidirectional Unicode text that may be interpreted or compiled differently than what appears below. To review, open the file in an editor that reveals hidden Unicode characters.
Learn more about bidirectional Unicode characters
| server: | |
| interface: 0.0.0.0 | |
| access-control: 0.0.0.0/0 allow | |
| prefetch: yes | |
| prefetch-key: yes | |
| # home zone | |
| local-zone: "home." static | |
| local-data: "hamster.home. 10800 IN A 192.168.1.1" | |
| local-data: "mypc.home. 10800 IN A 192.168.1.3" |
As can be seen I also create a few static domain entries so I can reference them without needing to remember the IP.
Finally, I create a block.conf using https://github.com/jodrell/unbound-block-hosts. This is placed at /etc/unbound/unbound.conf.d/block.conf.
Security
The important part for security, apart from the firewall, is enabling automatic updates so we always have the latest security patches installed. By doing this your router is going to be more secure than almost any home router out there. This is a little bit clunky to setup in debian, but works well once done.
First, install the unattended-upgrades package. Then create /etc/apt/apt.conf.d/20auto-upgrades:
This file contains hidden or bidirectional Unicode text that may be interpreted or compiled differently than what appears below. To review, open the file in an editor that reveals hidden Unicode characters.
Learn more about bidirectional Unicode characters
| APT::Periodic::Update-Package-Lists "1"; | |
| APT::Periodic::Unattended-Upgrade "1"; |
Then update /etc/apt/apt.conf.d/50unattended-upgrades:
This file contains hidden or bidirectional Unicode text that may be interpreted or compiled differently than what appears below. To review, open the file in an editor that reveals hidden Unicode characters.
Learn more about bidirectional Unicode characters
| Unattended-Upgrade::Origins-Pattern { | |
| // Archive or Suite based matching: | |
| // Note that this will silently match a different release after | |
| // migration to the specified archive (e.g. testing becomes the | |
| // new stable). | |
| "o=Debian,a=stable"; | |
| "o=Debian,a=stable-updates"; | |
| // "o=Debian,a=proposed-updates"; | |
| "origin=Debian,codename=${distro_codename},label=Debian-Security"; | |
| }; | |
| // List of packages to not update (regexp are supported) | |
| Unattended-Upgrade::Package-Blacklist { | |
| }; | |
| // Do automatic removal of new unused dependencies after the upgrade | |
| // (equivalent to apt-get autoremove) | |
| Unattended-Upgrade::Remove-Unused-Dependencies "true"; | |
| // Automatically reboot *WITHOUT CONFIRMATION* if | |
| // the file /var/run/reboot-required is found after the upgrade | |
| Unattended-Upgrade::Automatic-Reboot "true"; | |
| // If automatic reboot is enabled and needed, reboot at the specific | |
| // time instead of immediately | |
| // Default: "now" | |
| Unattended-Upgrade::Automatic-Reboot-Time "02:00"; |
That should be it to ensure auto updates happen.
Some final touches
- Enable persistent journal logs by setting
Storage=persistentin/etc/systemd/journald.conf. - Install
chronyorntpto keep system time up to date.
And that’s it! From here the sky is the limit. You can add any custom functionality you desire, like strongswan for external VPN. I’ve been using this setup for a couple years now with great success.
